- Home
- Learn Linux
- Learn Electronics
- Raspberry Pi
- Programming
- Projects
- LPI certification
- News & Reviews

Google Ads
30 January 2022
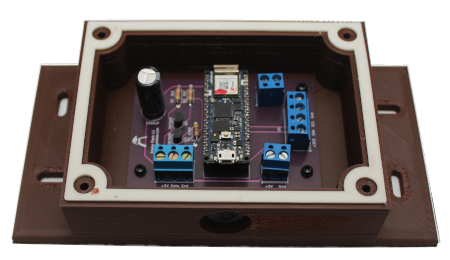
In this video I explain how I have designed a weatherproof outdoor enclosure for an Arduino RP2040 PCB that I have designed. The PCB provides a wireless Pixel Strip controller to control addressable WS2812B RGB LEDs (NeoPixels). It uses the Arduino Nano RP2040 connect, which is an Arduino board based around the Raspberry Pi RP2040, the same microcontroller as used in the Raspberry Pi Pico.
It is created using a 3D printer, using a combination of PLA (base and top) and TPU flexible filament (gasket). This provides a protective case / enclosure to protect the Arduino from being knocked and against the weather.
The enclosure is designed to be weatherproof rather than fully waterproof. This means it should be safe to use outdoors mounted on a wall, but I wouldn't recommend using it under water or cleaning it with a power washer.
This is used with my Arduino Pixel Server Project. The project page includes information on how to control the WS281x LEDs using the Arduino RP2040, how I created the PCB with a voltage level-shifter and how to program the webserver to control the LED sequence displayed.

The base is created using standard PLA material. It includes slots for mounting on an exterior wall. It includes a grommet for the cable entry. The PCB is mounted using self-tapping screws.
There are nut holes recessed into the base to hold the nuts in place. This may allow the lid to be removed without removing the enclosure from the wall.
The lid is also created in FreeCAD and printed in PLA. It has holes for M4 screws with a countersink for hex screw heads and a washer.

Between the enclosure base and the lid is a gasket. This is 3D printed using flexible filament. I tried with a very soft filament but the printer would not extrude using that. Instead I used a semi-flexible TPU filament from 3D PrintZ which worked really well.
The gasket goes 1mm into the base and the lid and then has an additional 0.5mm to create a seal. When under compression (through the lid screws) then this should provide a good water tight seal.
The gasket is shown in white in the above photos.
I used the following settings for printing the TPU:
Wall thickness 1.00 mm (higher for normal)
Top & bottom thickness 0.8mm
Infill density 10%
Print speed 20mm/s
Retraction off
I tested the enclosure in the shower. I placed the enclosure it in the same orientation as it will be mounted outdoors (with the grommet downwards) and there was no sign of any water entering the case.
4 x M2.6x6 self tapping screws
4 x M2.5 nylon washers (2.5x5x1)
4 x 50mm M3 screws with socket head
4 x M3 nuts
4 x M3 nylon washers (3x6x1)
1/2" grommet
PLA for base and lid
TPU (flexible filament) for waterproof gasket
This appears to work well at ensuring that no water is able to enter the enclosure. This is just one way of making an enclosure weather / water proof and I'd be interested in hearing of how other people have designed weatherproof enclosures with a 3D printer. Please leave a comment on the Weatherproof Arduino Enclosure YouTube video.

