- Home
- Learn Linux
- Learn Electronics
- Raspberry Pi
- Programming
- Projects
- LPI certification
- News & Reviews

Google Ads

I'm a big fan of WS281x RGB LEDs, better known by the Adafruit brand name of NeoPixels. These are individually addressable multi-colour LEDs which can be connected together and controlled by a single pin on the Raspberry Pi. I've written about their use: Raspberry Pi or Arduino NeoPixels (Smart RGB LEDs with ws281x). I've given a talk and created a workshop around them at some Raspberry Pi birthday events Disco Lights and NeoPixels at the Raspberry Pi Birthdays. I've also created a graphical user interface (GUI) for them using Pygame Neopixel GUI for the Raspberry Pi in Python Pygame. I think that the WS281x RGB LEDs are a great way of introducing people to physical computing, electronics and programming. They are easy to connect with some simple electronics, easy to program and the customization options are endless.
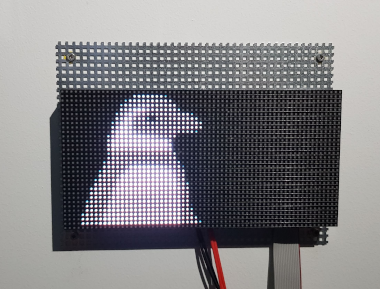
So when I created a handrail for my very steep drive, my first thought was whether I could string some NeoPixels along them to light up the way home and include a bit of a colour display at the same time. However I've done lots with NeoPixels already and I wanted a bit more of a challenge, so I thought wouldn't it be nice to have a string of NeoPixels that could display a simple image. I went out and bought some weatherproof RGB LEDs, which could probably do the job, but with two bundles of 50 LEDs provided only 100 LEDs, which works out as a 10 x 10 display. Whilst I could display some simple images they are going to be barely recognisable. Instead I bought a RGB Matrix display. This is a module that is designed to be used in the giant TV screens that you often see at sporting events, concerts or large advertising boards. These are often connected together to create a display with hundreds of thousands of pixels are more. Unfortunately a huge display is a bit out of my budget (as well as needing dedicated hardware), but I was able to buy one 32 x 64 pixel display. That single module still has just over 2,000 pixels which should give a reasonable blocky, but recognisable image.
Here's a video I created introducing the project.
![]()
The Matrix sounds like it may be similar in concept to the WS281x LEDs, but it's actually a bit different. Instead of having an individual chip for each LED the board has a number of driver chips on the back of the module. It needs multiple signals to drive the Matrix display including a clock, selection of the different rows and output enable as well as needing to passs the red, green and blue values separately. In total there are 16 connections that are needed which use up a complete ribbon connector. I did try a matrix HAT, but I was shipped what appars to be a faulty board. Also using a HAT would make it very difficult to fit inside the enclosure I am using (a box frame). I therefore wired directly to the Raspberry Pi Zero as per the following instructions: Wiring diagram for Raspberry pi to RGB LED Matrix screen.
I bought a standard 16-way ribbon cable with connector on both ends, and cut the cable into two. I then soldered the ends of the wires directly to the Raspbery Pi Zero. For my first I based it from my test setup which used jumper wires but to make it easier to follow I've mapped the pinout to the cable. The cable is shown looking into the pins with the wires then numbered from 1 to 16 starting with the red wire.

Below is a video showing how I soldered the ribbon connector direct to the GPIO of the Raspberry Pi Zero
![]()
My original plan was to use one Raspberry Pi which would control both the RGB Matrix display and the NeoPixels (RGB LEDs) which are along the handrail. My initial concern was that the PWM pin normally used for the NeoPixels was needed for the RGB LED Matrix. The latest version of the NeoPixel library has been updated to allow other pins, so I updated the circuit and code to use GPIO 21 (physical pin 40). I did some testing indoors and was able to get both the RGB Matrix and Neopixels working together.
When I moved the display outdoors then the RGB matrix worked fine, but the NeoPixels wouldn't come on. After some testing it appeared to be a distance problem (20 meters between the Raspberry Pi and the start of the NeoPixels). I did think about trying to clean the signal or having the signal retransmitted part way, but after investigating further I don't think it was so much the distance (as it wouldn't work with even a 1m cable) but due to the cable picking up noise which interferred with the signal.
I decided that the easiest way to get this to work was to add a new Raspberry Pi which is located at the start of the NeoPixel light string. This is mounted in a waterproof electrical box and is just within wireless range of my home wireless network.
Fortunately I happened to have a spare Raspberry Pi Zero handy and so used that instead. It proved to be much more reliable and easier than trying to have just one Raspberry Pi to control both the RGB Matrix and then Neopixels.
I used a box frame for the mount which was custom ordered to the size of the display with space for a motion sensor to be mounted as well. The mount was intended for indoor use so I waterproofed it using yacht varnish and silicon sealant. Full details are in the video below.
This video shows an updated software using a Raspberry Pi with a wireless RGB LED pixel server.
The generic software provides some demo code which allows you to display some simple patterns and scrolling messages. It does not provide a way to display static images, animations or video, which is what I wanted to display. I have therefore created my own code to do that. This is created as two programs, but created in a single repository on github.
The first program is matrix-display-images. It allows you to display a single image on an RGB LED matrix display, to display an animation from a series of images or to run in server mode where it reads a configuration file and can display images or animations based on the configuration file. This is written in C/C++ so as to run as close to the hardware as possible with maximum performance.
The second program is in a sub directory called matrix-messages. This is a python based server program which is designed to interact with the matrix-display-images program. It is designed to notify matrix-display-images about which images or animations to display based on certain date and time. It also supports a PIR sensor and can change the image or animation displayed based on whether the PIR sensor is triggered or not.
The program uses png files which can be created as image files using programs such as LibreOffice, Office 365 or GIMP. You can also create animations in Blender. See this Video tutorial on creating 2D animations in Blender 2.9.
Depending upon the type of PNG file that your application makes then you may need to perform some file conversions. In particular you need to remove any transparency and convert this to an 8-bit PNG file. This can be achieved using:
mogrify -background black -alpha remove -alpha off -format PNG8 *.png
Rename the files .png and they should then work. Note that the images need to have 4 digits eg. prefix_0001.png.
This is currently work in progress and does contain bugs, so do not use this in a production environment without your own testing.
Here is a Star Wars animation that I created for the 4th May Star Wars Day celebration. May the 4th be with you.
It is set to automatically play in loop on the 4th of May each year.

Whilst I was working on this project the Covid-19 Coronovirus pandemic was spreading around the world. The UK was in lockdown and we found ourselves greateful for the work of those risking their own lives to help others. I therefore repurposed the Matrix display for thank you messages, and messages of support for the local community.
I'm always working on new projects
To find out about the updates please:
Subscribe to the PenguinTutor YouTube Channel
and
Follow @penguintutor on Twitter
Please view the copyright information regarding use of the circuits.

