- Home
- Learn Linux
- Learn Electronics
- Raspberry Pi
- Programming
- Projects
- LPI certification
- News & Reviews


In this guide we will set up the Raspberry Pi PIXEL Operating System in a virtual machine. This is for the older version of the Raspberry Pi desktop image. For the latest version see Raspberry Pi Desktop Virtual Machine.
PIXEL is the name given to the operating system implementation as used on the Raspberry Pi. It is a Linux based operating system which is based on the Debian distribution, called Raspbian. It has then had a customized user interface to give the user a more consistant experience.
Initially PIXEL was only available for the Raspberry Pi, but released in 2016 it is now available to run on x86 based PCs. This is the version we will be running here.
A virtual machine provides the ability to run multiple operating systems on a single computer. It is used in computer data centres to allow multiple virtual computers to run on a single physical server. This reduces cost and power consumption by reducing the number of servers required and ensuring those that are used are used efficiently.
Note that this is not emulation which is sometimes used to run software inside another computer operating system. Whereas emulation converts each instruction before running it in the host operating system, virtual machines run directly on the processor. This is more efficient and allows the virtual machines to run at the native speed of the underlying hardware (or very close to it).
The screenshot below shows PIXEL running inside of a Kubuntu (Linux operating system)
![]()
Some terminology that may come in useful is the words host and guest. When referring to virtual machines then a host is the operating system that runs directly when the computer is started. It's also the operating system where VirtualBox is started from. The guest (or guests) are the virtual machines that are then run later. The reason that this is so important is that the guest sometimes needs to ask the host to do things on it's behalf (such as networking which I will explain later).
The virtual machine can be run on most recent PCs. It will run better on a more modern computer which includes virtualization support. I do recommend that you have a reasonable amount of memory. The reason for needing lots of memory is that each operating system will need it's own memory. I'd recommend at least 2GB, but if you are running a memory hungry operating system then you may be better with around 4 to 6GB.
You need a host operating system installed on your computer which could be Linux, Windows or OSX.
The VirtualMachine software that we will run is VirtualBox which is available as open source software.
For Linux users then VirtualBox will mostly likely be included within your standard software repository. In the case of a Debian / Ubuntu based distribution then this is as easy as launching a terminal and running:
sudo apt-get install virtualbox
If running Windows or OSX, or if you want to run the latest version for Linux then you can download the binaries from virtualbox.org.
You then follow the standard process for installing the software on your system.
A CD containing PIXEL was included in The MagPi magazine, although I recommend downloading from the Raspberry Pi website where the most recent version will be available. See PIXEL for PC and MAC. You should save the files as a .iso (dvd image) on your computer.
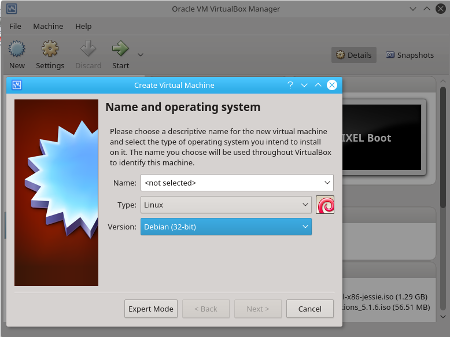
To boot from the PIXEL image go into VirtualBox and click on New to create a new Virtual Machine.

Give the virtual machine a name (eg. PIXEL), set the type to Linux and version to Debian 32-bit (on which PIXEL is based). You will then need to select the amount of memory (RAM) to allocate to the virtual machine. The recommended minimum is 1024MB, which is a good amount. If you have a lot of memory then you could make this larger.
You will then be asked about whether to create virtual hard disk. Normally you would create a virtual hard disk to install the operating system on as well as any additional data. In this case we will leave the OS on the CD-ROM and use the hard disk for any changes and data. Go ahead and create a virtual hard disk. It asks what type of disk file to create, but you can just choose the default VDI (Virtual Disk Image). I then recommend choosing Dynamically allocated; this will mean that the virtual hard disk can start small and increase in size as required, otherwise you will lose usable space on the host PC. Assuming you have chosen dynamically allocated then you can create a really big virtual drive that will mean you won't need to manually resize it in future. I have set mine to 50GB, although it's unlikely it will ever reach that size.

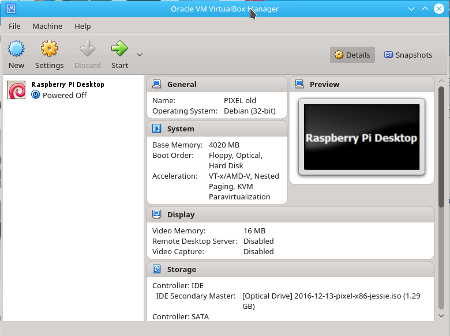
This will create a new virtual machine as shown below.

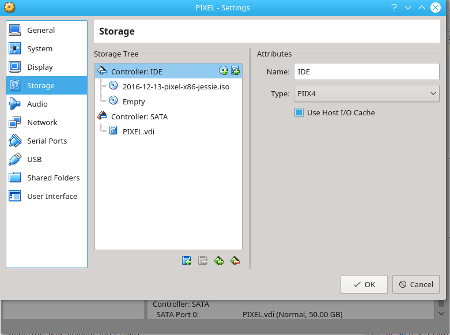
Now add the CD image as a virtual disk drive. Select the virtual machine and choose settings.

On the storage tab (above) there will be an empty IDE controller and a SATA controller which has the new virtual disk drive on it. Choose the IDC controller and choose "Add new storage attachment" (which is the left most icon on the bottom) and then "Add Optical Drive". Choose disk and then find the ISO image downloaded from the Raspberry Pi website.

After saving the changes click on Start to start the virtual machine which will boot from the PIXEL DVD iso image.
![]()
The virtual machine will now start and PIXEL will run. You should now see the familiar operating system which looks very similar to when running on the Raspberry Pi. Unfortunately any changes you make or save will be lost when you next reboot, so next we need to setup persistence to allow us to configure the operating system and save any files.
As the virtual machine boots from a DVD image it is unable to save any changes to the disk. To overcome this limitation we can use virtual hard disk drive that we created earlier which will be used to save any data or changes to the operating system. These files will then be made available when the virtual machine starts.
WARNING: This stage will involve running some potentially dangerous commands. Always make sure that you are working inside the virtual machine and that you don't accidentally enter these commands on a different computer or virtual machine.
During the setup you will have created the virtual hard disk, but the disk will need preparing and formatting before it can be used. First create a disk partition using cfdisk. Start a terminal and after checking you are on the correct system (the prompt will say pi@raspberrypi) enter:
sudo cfdisk /dev/sda
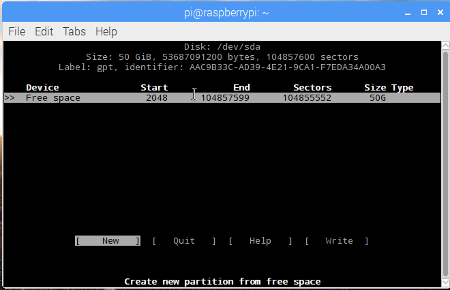
Accept the first option of using the disk as a gpt disk. Now check the details are as expected - in particular that it does not show any partitions that are in use and that it matches the size of the disk created previously.

Choose "New" to create a new partition, accept the default of using the full disk drive as a single partition.

As you can see the file system type has defaulted to Linux, so use the right arrow to select "Write". Type yes to write the changes and then choose Quit.
The new partition is called sda1. It can now be formatted with the ext4 file system which is commonly used by Linux. This is done by running:
sudo mkfs.ext4 /dev/sda1
WARNING: Once more check you are on the correct system as it will wipe any data on the partition without any warning.
Now give the disk the name "persistence" using the elabel command.
sudo e2label /dev/sda1 persistence
You will now need to add a persistence.conf file to the disk. Enter the following commands to mount the disk on a temporary mount point:
sudo mkdir /mnt/temp

sudo mount /dev/sda1 /mnt/temp
Add the file using:
sudo leafpad /mnt/temp/persistence.conf
Add the following on the top line:
/ union
Also create a blank second line (as I found that it did not work without it). Save the file and quit from the editor.
Now reboot the virtual machine and persistence will be enabled.
Prior to using the virtual machine for any work you create then I suggest you create a file in your home directory and then reboot again. If the file exists after the reboot then persistence is working. If not then ensure that you have followed the instructions correctly, especially in terms of labelling the disk persistence and creating the persistence.conf file.
Now that you have persistence working you can make any configuration changes and save files and they will be kept between reboots.
One thing you may want to look at first is the VirtualBox virtual machine settings. Most of these changes can only be done when the virtual machine is not running, so shutdown PIXEL first.
Choose the virtual machine from the VirtualBox manager. Many of the settings are ones that were configured during the install which can now be changed as required. Other settings are best left at their default unless you have a specific requirement. One thing you may want to change is the networking setup.
As default the networking is setup as a NAT connection. Using a NAT connection means that the virtual machine has it's own address which can only be seen by itself and the host computer, but when accessing the Internet it appears to connect from the host computer. This normally works well if you just want to connect from the guest computer to the Internet or from the guest to other 'real' computers. It doesn't work so well if you want to communicate from another computer to the guest, or between guest virtual machines.
A useful alternative is for a bridged connection, which is referred to as a "bridged adapter". In the case of a bridged connection then the guest will appear as though it was any other computer on the local network. This assumes that you have a router on the network able to handle multiple connections which is the case for most home networks.
As a general rule bridged is often better, but if that doesn't work (such as in a school with restricted network access) then you may need to switch back to NAT.
Other settings that are worth considering are ones that allows shared resources between the host and guest. For example being able to copy and paste between machines using the clipboard, or sharing a disk drive. These need the guest additions to be installed. Unfortunately, at the moment it is very difficult to install the guest additions on PIXEL and it is outside of the scope of this guide.
This guide is specifically about how to run PIXEL as a virtual machine, but you could just run it directly from the DVD and/or a USB memory stick. In that case you will no longer be able to access the OS installed on your PC until rebooting.
The Raspberry Pi PIXEL image is a good way to use Linux in a virtual machine. If you are already familiar with the Raspberry Pi then it provides the same look and applications that you are familiar with (except for a few applications dropped for Licensing reasons - such as Minecraft and Wolfram), but it is not the only Linux operating system that you could use. Most other Linux distributions can be installed directly into a virtual machine without needing to worry about creating a persistence drive.
As long as you have enough disk space you can install as many different virtual machines as you like, and if you have enough memory you can even run several at the same time.
So after trying PIXEL why not give another distribution a go. There are some alternatives listed at About Linux distributions.