- Home
- Learn Linux
- Learn Electronics
- Raspberry Pi
- Programming
- Projects
- LPI certification
- News & Reviews


An updated version of this project is now available in the Pi Power project file.
It's useful to be able to turn mains electricity on using a computer program. Whilst it's not hard to create an electronic circuit that can switch mains voltages, if not done correctly it can be dangerous. This is where the remote control sockets can be used to create a physical barrier between the low voltage electronic circuit and the dangerous high voltage electricity in the socket.

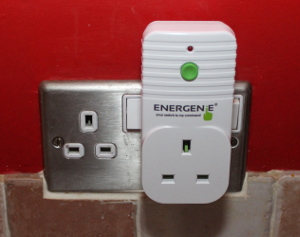
Energenie provide a range of sockets that can be controlled by remote control. They also sell a pi-mote which is an add-on board for the Raspberry Pi making it easy to tun the sockets on and off from a Raspberry Pi. The pi-mote plugs into the GPIO connector of the Raspberry Pi and then sends commands using a wireless signal to the power sockets.
I soldered an aerial (consisting of a 135mm long piece of wire) to the pi-mote to increase it's range, but other than that everything else is just a case of creating the software to send the appropriate signals to the Raspberry Pi.
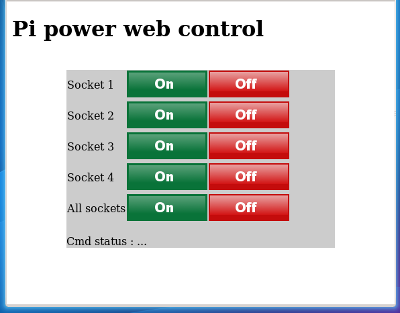
I have written a own web interface using Python which allows the sockets to be turned on using a simple remote control interface that can be accessed on a computer or mobile phone on the local wireless network. The web app uses Python GPIO Zero and the Python bottle web framework. The bottle web framework is a simple way to create a web application with a built in web server rather than needing a separate web server such as Apache.

The most up-to-date code is available from git:
Git penguintutor pi-power project
Full install instructions are provided in the INSTALL.md file.
After starting the web interface (eg. reboot after following the install instructions) you can then connect to interface using the IP address of the Raspberry Pi in a web browser (use ip addr on the Raspberry Pi to find your IP address). It should be possible to connect from a Raspberry Pi, PC or mobile phone and click the appropriate button to turn the socket on and off.
You do need to register the socket with the controller (if not already done using the Energenie demo code). This may vary with different sockets; for the model I use involved starting with the socket in the off position (press green button until the LED is off) then holding down the green on/off button for a few seconds (until the LED starts flashing) and then using the preferred on button on the remote / web page.
Mulitple sockets can be registered against the same switch number on the web interface, but that will mean that all sockets registered to that switch number will turn on and off at the same time.
As well as being able to control the lights from the app it's possible to automatically turn the lights on and off on the Raspberry Pi using crontab. This uses the same web app and a command line tool wget to 'download' the page that requests the appropriate action. I have used this to turn sockets on automatically in the mornings and off in the evenings. You can even add different rules to turn the lights on at different times on weekends vs weekdays or on specific days.
The following shows some simple rules to turn the lights on and off automatically.
# m h  dom mon dow   command

0 8 * * 6-7 wget -O/dev/null http://127.0.0.1/switchon?socket=0

30 15 * * 1-5 wget -O/dev/null http://127.0.0.1/switchon?socket=2

0 23 * * * wget -O/dev/null http://127.0.0.1/switchoff?socket=0

0 9 * * * wget -O/dev/null http://127.0.0.1/switchoff?socket=2
Note that the -O option (capital o) is used to output the download to a file. In this case /dev/null is used which effectively means "save it no-where".
For an example of this in use see Raspberry Pi Energenie pi-mote controlling Christmas Tree lights.