- Home
- Learn Linux
- Learn Electronics
- Raspberry Pi
- Programming
- Projects
- LPI certification
- News & Reviews

Google Ads
In this guide we will set up the Raspberry Pi Desktop Operating System in a virtual machine.
Raspberry Pi Desktop is the name given to the operating system implementation as used on the Raspberry Pi, but installed on a PC. It is a Linux based operating system which is based on the Debian distribution, called Raspbian. It has then had a customized user interface to give the user a more consistant experience.
A virtual machine provides the ability to run multiple operating systems on a single computer. It is used in computer data centres to allow multiple virtual computers to run on a single physical server. This reduces cost and power consumption by reducing the number of servers required and ensuring those that are used are used efficiently.
Note that this is not emulation which is sometimes used to run software inside another computer operating system. Whereas emulation converts each instruction before running it in the host operating system, virtual machines run directly on the processor. This is more efficient and allows the virtual machines to run at the native speed of the underlying hardware (or very close to it).
The screenshot below shows Raspberry Pi Desktop running inside of a Kubuntu (Linux operating system)
![]()
Some terminology that may come in useful is the words host and guest. When referring to virtual machines then a host is the operating system that runs directly when the computer is started. It's also the operating system where VirtualBox is started from. The guest (or guests) are the virtual machines that are then run inside the virtual machine environment. The reason that this is so important is that the guest sometimes needs to ask the host to do things on it's behalf (such as networking which I will explain later).
The virtual machine can be run on most recent PCs. It will run better on a more modern computer which includes virtualization support. I do recommend that you have a reasonable amount of memory. The reason for needing lots of memory is that each operating system will need it's own memory. I'd recommend at least 2GB, but if you are running a memory hungry operating system then you may be better with around 4GB or more.
You need a host operating system installed on your computer which could be Linux, Windows or OSX.
The VirtualMachine software that we will run is VirtualBox which is available as open source software.
For Linux users then VirtualBox will mostly likely be included within your standard software repository. In the case of a Debian / Ubuntu based distribution then this is as easy as launching a terminal and running:
sudo apt install virtualbox
If running Windows or OSX, or if you want to run the latest version for Linux then you can download the binaries from virtualbox.org.
You then follow the standard process for installing the software on your system.
The desktop image can be downloaded from the Raspberry Pi website. You need to make sure you download the Deskop Image
The file downloaded is an ISO file which is a CD / DVD image. There is no need to extract the files as the virtual machine can use it as though it was a DVD inserted into the computer.
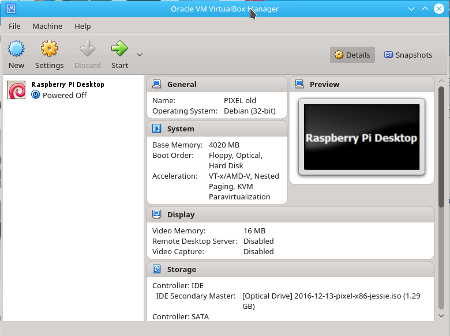
First you need to create a new virtual environment under the VirtualBox Manager. Choose New to create a new Virtual Machine.

Give the virtual machine a name (eg. Raspberry Pi Desktop), set the type to Linux and version to Debian 32-bit (on which PIXEL is based). You will then need to select the amount of memory (RAM) to allocate to the virtual machine. The recommended minimum is 1024MB, which is a good amount. If you have a lot of memory then you could make this larger. This is something you can change later so no need to worry about it too much.
You will then be asked about whether to create a virtual hard disk. As it's name suggests this is a virtual version of a hard disk drive. It's implemented as a file on the host computer but looks like a hard drive to the guest.
Choose create a virtual hard disk now. It asks what type of disk file to create, but you can just choose the default VDI (Virtual Disk Image). I then recommend choosing Dynamically allocated; this will mean that the virtual hard disk can start small and increase in size as required, otherwise you will lose usable space on the host PC. Assuming you have chosen dynamically allocated then you can create a really big virtual drive that will mean you won't need to manually resize it in future. I have set mine to 50GB, although it's unlikely it will ever reach that size.

This will create a new virtual machine as shown below.
After saving the changes click on Start to start the virtual machine.
You will then need to specify the drive to boot initially. In this case click on the folder to the right and choose the ISO image you downloaded previously.
The DVD image will now boot and it asks how you would like to run.
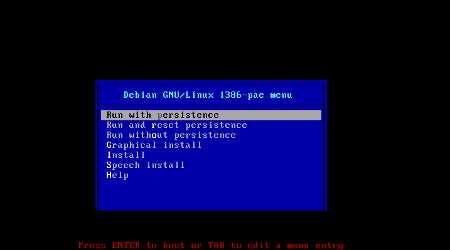
It's easiest to use the Graphical Installer, so choose that.
Choose your keyboard country and after booting the systems then you will be asked about how to partition the disks.
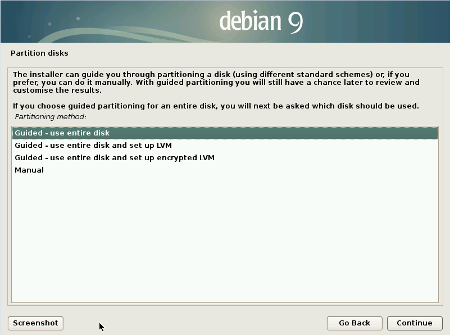
You can choose the default "Guided - use entire disk". The encrypted option would allow you to protect your data if you wanted to use that. You can do something different usual manual, but that can be more complicated.
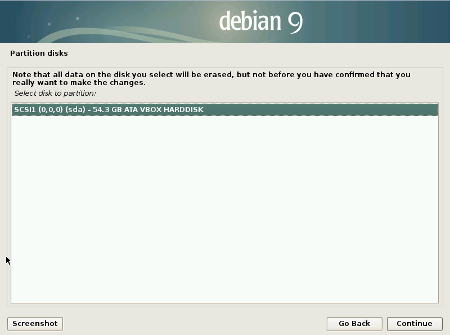
Next you will be asked if you are sure before erasing all the data on your disk. It may look like it's about to wipe your entire computer (sda is normally your first hard disk drive), but if you look it says VBOX HARDDISK image so you can safely click continue and it will only wipe the data on the virtual box virtual disk drive.
It then asks whether you want a single partition or multiple partitions. When running on a normal PC there are advantages to going for multiple partitions, but for simplicity I recommend you follow the advice of having "All files in one partition".
You then two more chances to change your mind, before the virtual hard disk drive is formatted and the operating system installed. Select "Yes" on the second of those and it will then start the install.
It will ask where to install GRUB. Just accept the default to install it to the master boot record. Then choose /dev/sda which is the virtual disk that was created previously.
Finall click continue to reboot and it should start the Raspberry Pi Desktop Image
One thing you may want to look at first is the VirtualBox virtual machine settings. Most of these changes can only be done when the virtual machine is not running, so shutdown PIXEL first.
Choose the virtual machine from the VirtualBox manager. Many of the settings are ones that were configured during the install which can now be changed as required. Other settings are best left at their default unless you have a specific requirement. One thing you may want to change is the networking setup.
As default the networking is setup as a NAT connection. Using a NAT connection means that the virtual machine has it's own address which can only be seen by itself and the host computer, but when accessing the Internet it appears to connect from the host computer. This normally works well if you just want to connect from the guest computer to the Internet or from the guest to other 'real' computers. It doesn't work so well if you want to communicate from another computer to the guest, or between guest virtual machines.
A useful alternative is for a bridged connection, which is referred to as a "bridged adapter". In the case of a bridged connection then the guest will appear as though it was any other computer on the local network. This assumes that you have a router on the network able to handle multiple connections which is the case for most home networks.
As a general rule bridged is often better, but if that doesn't work (such as in a school with restricted network access) then you may need to switch back to NAT.
Other settings that are worth considering are ones that allows shared resources between the host and guest. For example being able to copy and paste between machines using the clipboard, or sharing a disk drive. These need the guest additions to be installed. Unfortunately, at the moment it is very difficult to install the guest additions on PIXEL and it is outside of the scope of this guide.
When you run the virtual machine you will see that the screen is a fixed size (probably quite small compared to the host computer). Also some features such as copy and paste between the Raspberry Pi Desktop and the host computer won't work. For this you need to install the Virtualbox guest additions.
From the VirtualBox menu at the top of the VirtualMachine click on Devices -> Insert Guest Additions CD Image. You should then see a pop-up saying that a removal medium is inserted (which is acting as though a CD has been inserted into a virtual drive).
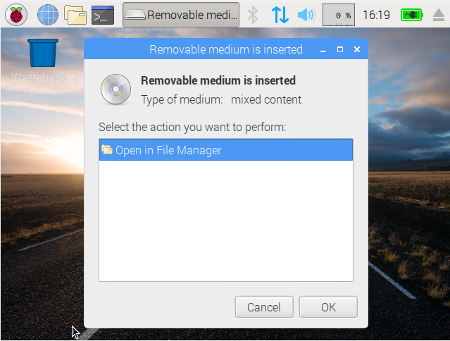
You can Cancel the pop-up and we will run the setup from the command line. Launch a terminal client (Launcher button -> Accessories -> Terminal).
Run the following commands on the command line:
cd /media/cdrom0


sudo bash VBoxLinuxAdditions.run
It will take a short time to install and then you can reboot the virtual machine (it is only the guest you need to reboot, not your host computer).
After a reboot you should be able to resize the Virtual Screen and enable the shared clipboard under the Devices menu.
You can now update the operating system using:
sudo apt update


sudo apt upgrade
This guide is specifically about how to run the Raspberry Pi Desktop in a virtual machine, but you could just run it directly from the DVD and/or a USB memory stick. In that case you will no longer be able to access the OS installed on your PC until rebooting.
The Raspberry Pi Desktop image is a good way to use Linux in a virtual machine. If you are already familiar with the Raspberry Pi then it provides the same look and applications that you are familiar with (except for a few applications dropped for Licensing reasons - such as Minecraft and Wolfram), but it is not the only Linux operating system that you could use.
As long as you have enough disk space you can install as many different virtual machines as you like, and if you have enough memory you can even run several at the same time.
So after trying the Raspberry Pi Desktop image why not give another distribution a go? There are some alternatives listed at About Linux distributions.

