- Home
- Learn Linux
- Learn Electronics
- Raspberry Pi
- Programming
- Projects
- LPI certification
- News & Reviews

Google Ads
This guide explains how to automatically start a program running on a Raspberry Pi or other Linux computer.
Firstly, why would you want to start a program or application automatically? There are already dozens or even hundreds of programs or daemons that run a computer. These could be keeping the time on your computer correct, handling print requests, receiving networking requests, handling the graphical interface or even starting other programs to run at scheduled times. If you enjoy physical computing maker projects (in which case you may want to look at my list of maker projects), then it's quite common to want them to start automatically so that they can start running a program without needing user interaction, or so that they start a program that a user may interact with.
This guide will be based around systemd and using desktop files with autostart. Most Linux distributions now implement these, but there are some that don't. You may need to check your particular distribution.
There are other ways of getting programs to run automatically, but these are two that are generally well supported and based around the modern approach. With these two techniques then you should be able to start any kind of program you need. Some other techniques use older technology, whilst these still work thanks to legacy support it is better to use these newer methods.
I'll treat these as two different types of programs that you want to startup.
Starting with server code. Using my RGB matrix display as an example.
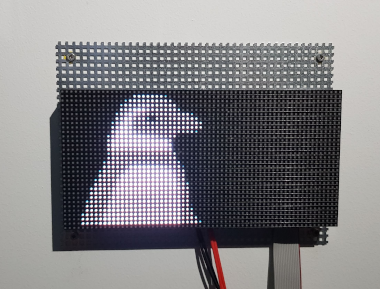
This is a RGB matrix screen which is mounted outside my house. The finished version has the Raspberry Pi fully enclosed inside a picture frame so it's not possible to connect a screen and keyboard without unmounting the whole setup.
This actually uses two separate server daemons. One handles displaying the images on the display, and the other provides scheduling of different types of images and animations. I'll start by looking at the matrix-display-images service which actually displays the images on the screen.
This needs a file ending with .service, which is stored in /etc/systemd/system. The file is called matrix-display-images.service.
[Unit]

Description=Display images on RGB Matrix

After=sshd.service


[Service]

ExecStart=/home/pi/matrix-display-images/matrix-display-images

User=root


[Install]

WantedBy=multi-user.target
This is a very basic service file using minimal requirements. The common configuration items are in the [Unit] and [Install] sections and the [Service] section has items specific to the service being started.
Description=Display images on RGB Matrix
The descripion is fairly obvious by it's name, it's a user readable string saying what the service does.
After=sshd.service
The After instruction says to start this after a particular service is started. In this case I've put it after the sshd service. In this case it's doesn't really need the sshd service to be running first, but I didn't want it to start until after the network is available so this works well. There are different instructions which can be used such as before (to ensure this starts before another service) and requires which creates a stronger requirement dependancy. The after instruction is sufficient here.
ExecStart=/home/pi/matrix-display-images/matrix-display-images
The ExecStart is used for the command that gets executed. You should enter the full path of the executable file, you cannot assume that you will be in your home directory. In fact the systemd daemon will be running as root and not under your username.
User=root
Which brings us nicely into the next instruction which defines the User that the service should run under. In this case the executable needs root permissions to be able to talk to the hardware, but if you don't need adminstrator permissions then you should normally use a less privilaged user.
WantedBy=multi-user.target
The final line is the WantedBy which is used to ensure that this starts whenever the computer starts in normal user level mode. Using the multi-user.target means that this will start before the GUI and in fact will start even if the GUI isn't going to start, such as the headless mode that this particular setup users.
Change the file so it is owned by root
sudo chown root:root /etc/systemd/system/matrix-display-images.service
Make the file executable by running
sudo chmod 755 /etc/systemd/system/matrix-display-images.service
It's a good idea to test the script at this point rather than waiting until after a reboot. This is done using:
sudo systemctl start matrix-display-images.service
You can then check it's running using:
sudo systemctl status matrix-display-images.service
You can now enable startup at boot using systemtctl
sudo systemctl enable matrix-display-images.service
Here's another example which uses a .service file. This is for the Python program which runs alongside the matrix-display-images code.
[Unit]

Description=Matrix Message display messages on RGB Matrix

After=sshd.service


[Service]

Type=simple

ExecStart=/home/pi/matrix-display-images/matrix-messages/matrix-messages.py

User=pi


[Install]

WantedBy=multi-user.target
This is similar to the previous example, but designed to run as the normal pi user and not root. You will also see I've included Type=simple, but that's the default anyway. This just means that the program will be considered to have started once the main process is running. This is used when your program runs as a single process and doesn't fork (split into multiple threads).
There are lots of other commands that can be used in a .service file depending upon how the program should be started, what it's dependancies are and what the system should do if it doesn't start correctly or whether it should try and restart it if it crashes.
There are lots of other reasons that you may want to use systemd to start a program. Here are a few examples.
The other example is how to start an application once XWindows has started. This can be useful if you want a graphical application running (such as one written in Pygame / Pygame Zero) or if you want to be able to use a joypad using qjoypad.
This guide is based around LXDE which is what is used on the Raspberry Pi OS image, but it's similar for other desktop environments. This also assumes you have auto-login enabled, otherwise it will start when you actually login.
This method is based around creating a .desktop file. This is useful as the .desktop file is also used if you want to make a custom launcher and menu item on the startmenu. This means it's useful to understand these files anyway, but some of the options may not be necessarily be used for the autostart.
Start by looking at something useful. How to start the Chromium web browser each time the system starts. You can find the existing desktop file for the Chromium browser by finding the icon on the start menu, right-clicking and choosing properties. It is truncated a bit, but you can find this by going to /usr/share/applications. You can open that in a text editor and see how this works.
First there are lots of additional entries for different languages. Whilst they can be useful for those that don't speak English they make the file look very complicated, so I'm going to start by removing those entries. This need sto be done for Name, GenericName and Comment. I'm also going to remove everything from the line Desktop Action NewWindow and below. There are a few different sections, but they are only really applicable when the browser is already running.
The remaining file is shown below:
[Desktop Entry]

Version=1.0

Name=Chromium Web Browser

GenericName=Web Browser

Comment=Access the Internet

Exec=chromium-browser %U

Terminal=false

X-MultipleArgs=false

Type=Application

Icon=chromium-browser

Categories=Network;WebBrowser;

MimeType=text/html;text/xml;application/xhtml_xml;x-scheme-handler/http;x-scheme-handler/https;

StartupNotify=true

Actions=NewWindow;Incognito;TempProfile;

X-AppInstall-Package=chromium-browser
This is a [Desktop Entry] which is to specification Version=1.0. Note that the version number here is the specification for the desktop entry and not the version of the web browser.
The Name, GenericName and Comment are all user readable strings used for hover tips etc.
The Exec entry says what should be executed. Here this says chromium-browser %U. The first part is the name of the executable to run. This just uses the name chromium-browser. There is no path so the command needs to be in the search path, in this case it's in /usr/bin. If you are running your own program which is not in the search path then you should include the full path to the executable. The %U is how URLs can be sent to the browser for it to open those directly, using a capital letter U means that each of the entries (urls in this case) are sent as a separate argument.
Terminal=false is used because this is a graphical application. If you wanted to start a command line program in a terminal shell then you would use true here insead. I'm not sure about X-MultipleArgs; it appears to be an extension of the original specification so it's not listed there. Presumably it's something to do with how multiple arguments are sent to the browser executable and so it's not going to be important for autostart.
Type=Application defines this as an executable file. It has an Icon which is for ... you've guessed it ... the icon to display. Categories defines what categories it is listed under, ie. which submenu it would be added to on the start menu. The MimeType determines which file types the program should open.
The StartupNotification parameter says that the desktop environment supports startup notification. For example in other desktop environments such as Gnome then it can be used to stack the application icon on top of the pinned application.
The Actions parameter is used to add alternative options on the start menu, but this is not supported in LXDE anyway. Finally the X-AppInstall-Package is another extension to the specification used to indicate how the program is installed or uninstalled.
This desktop file can be added to the start menu, but it can also be used to autostart a program by saving it in the /home/pi/.config/autostart directory. If that direction doesn't already exist then it will need to be created.
Save it into the autostart directory and reboot and you should see that the Chromium browser starts up automatically.
You can also change that file. For example if you wanted the browser to to start with a specific webpage then replace the executable string with
chromium-browser --noerrdialogs --disable-infobars --kiosk http://www.penguintutor.com
Note that this is not enough to use this as a secure kiosk. There are other things in the operating system that you should disable as well, and you'd probably want to start with a minimal operating system, but it does provide the way you can autostart the webbrowser in the console mode.
Another example is where you have created a program to interface to an electronics project. This maybe to make allow the program to interact itself with electronics easily, to make it easier for the user to access the application once it's turned on, or it maybe to allow interaction through something that needs the GUI to be available (such as a joystick or joypad using qjoypad).
If it's just an application that will run in the background then that may be better through systemd, but if the program needs to be able to access through the GUI (such as using Pygame / Pygame Zero) then this would be the way to handle that. You won't necessarily have a desktop file already, so this will show a basic startup file that can be used. I'll also show how you can use this to launch another program, using the example of qjoypad.
In this example I will show how you can autostart my snowman badge project. The project details are available at Snowman Raspberry Pi wearable project. This is designed to use as a badge and there is no physical screen attached. This means it has to run automatically, but because it uses a joypad to control it then it needs to be run under a GUI. As it needed to run in a GUI environment I created the code using Pygame Zero (although this can also be used if the program runs in a terminal but can interact with Qjoypad). This example uses qjoypad used to interact with pygame zero games. The snowman code and qjoypad need to be setup correctly first, using the previous links.
The first thing is that I've already created a script which can be used to start both qjoypad and the snowman program. This is located in the GitHub for Raspberry Pi Snowman Badge. The script is called snowman.sh and contains the following.
#!/bin/bash


cd /home/pi//snowman

qjoypad "snowman" &

pgzrun snowman.py
The code first changes to the appropriate directory. It then starts qjoypad with the snowman layout file. Note that the ampersand (&) on the end is required so that it runs in the background. Then the snowman.py is called used pgzrun (Pygame Zero). This is made executable and is the script that will be called from either the start menu or autostart.
The reason for running it through this script is that I always want qjoypad running whenever I start the game (although it can be run from the keyboard it's really designed to be used with a joypad). Therefore this can be added to the start menu and it will always launch qjoypad. When using it through the autostart then you could create two separate autostart files, but as I'd created that script already I think it's better to just create one .desktop file. Note that if you run the program multiple times (eg. if closed one and then start again) then qjoypad will be called multiple times, however qjoypad does not allow multiple instances so it will just continue running the original one. If you used this method for a program that can run multiple instances then that is something you need to be aware of.
Using this script it's possible to create a .desktop startup file which starts the script on login. A basic example is shown below:
[Desktop Entry]

Version=1.0

Name=Snowman

Comment=Play the snowman game

Exec=/home/pi/snowman/snowman.sh

Type=Application

Terminal=false
The commands included in here are all ones that I've already explained with the Chromium example, but I've only used a small subset of those commands. Save this in /home/pi/.config/autostart as snowman.desktop and it will then start automatically and you can use the joypad with the game.
The same technique can be used for other programs that need qjoypad, such as some of the Raspberry Pi robotic projects.
For details of how to schedule program see scheduling applications to start using cron and crontab.

