- Home
- Learn Linux
- Learn Electronics
- Raspberry Pi
- Programming
- Projects
- LPI certification
- News & Reviews


Python PySide6 provides a way of creating graphical applications using the Qt Framework. One of the less well documented features is how to create graphical images using basic shapes and the use of QGraphicsView and QGraphicsScene. This will cover both of those as well as showing how you can implement zoom funcation using the control key and the mouse scroll wheel.
This video explains about the example program, how to create a GUI, how to add elements (shapes), how to group shapes together. Making the objects movable, and how to implement zoom using the mouse scroll wheel.
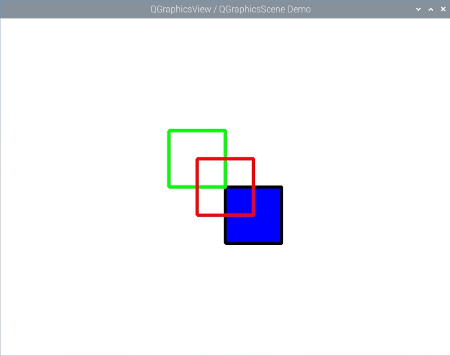
The example program is shown in the screenshot below.

PySide 6 provides QGraphicsView and QGraphicsScene as a way for creating a graphical items (lines, shapes, text etc.) on a 2D surface. It provides a lot of functionatlity needed for creating a graphical application.
PySide QGraphicsView provides a scrollable viewport designed to hold a QGraphicsScene. Then the QGraphicsScene provides a surface where objects can be drawn. This is achieved using the following code (note that I created these as attributes to the MainWindow class by using self, which I use to make it easier to access the items.
self.scene = QGraphicsScene()

self.view = QGraphicsView(self.scene)
Once that is done then you can create objects on the QGraphicsScene. For example to add a rectangle you may use.
self.scene.addRect (50, 50, 100, 100)
You may also want to add a pen as the next argument (for the line / edge color), and perhaps a brush for the 6th argument (for the fill).
Scrollbars are automatic and you can zoom in and out by applying the scale method to QGraphicsView.
Below is the source code for the three example files used in the video.
import sys

from PySide6.QtWidgets import QApplication

from mainwindow import MainWindow


class App(QApplication):

    def __init__ (self, args):

        super().__init__()


app = App(sys.argv)

main_window = MainWindow()

main_window.show()

app.exec()
from PySide6.QtCore import QSize, Qt

from PySide6.QtGui import QPen, QBrush

from PySide6.QtWidgets import QApplication, QMainWindow, QGraphicsView, QGraphicsScene, QGraphicsItem

from vgraphicsscene import ViewGraphicsScene


class MainWindow(QMainWindow):

    def __init__(self):

        super().__init__()


        self.setWindowTitle("QGraphicsView / QGraphicsScene Demo")


        self.setFixedSize(QSize(800,600))


        # Create QGraphicsScene and QGraphicsView

        self.scene = ViewGraphicsScene(self)

        self.view = QGraphicsView(self.scene)


        green_pen = QPen(Qt.green)

        green_pen.setWidth(6)

        red_pen = QPen(Qt.red)

        red_pen.setWidth(6)

        black_pen = QPen(Qt.black)

        black_pen.setWidth(6)

        blue_brush = QBrush(Qt.blue)


        rect1 = self.scene.addRect (50, 50, 100, 100, green_pen)

        rect2 = self.scene.addRect (100, 100, 100, 100, red_pen)

        rect3 = self.scene.addRect (150, 150, 100, 100, black_pen, blue_brush)


        rect_group = self.scene.createItemGroup([rect1])

        rect_group.addToGroup(rect2)


        rect_group.setFlag(QGraphicsItem.ItemIsMovable)

        rect3.setFlag(QGraphicsItem.ItemIsMovable)


        # Add QGraphicsView to main window

        self.setCentralWidget(self.view)


    def zoom_in (self):

        self.view.scale(2, 2)


    def zoom_out (self):

        self.view.scale(0.5, 0.5)
from PySide6.QtWidgets import QGraphicsScene

from PySide6.QtGui import QWheelEvent

from PySide6.QtCore import Qt


class ViewGraphicsScene (QGraphicsScene):


    def __init__(self, main_window):

        super().__init__()

        self.main_window = main_window


    ## Code to handle CTRL & Scroll Wheel for zoom

    def wheelEvent(self, event):

        # If control key not pressed then use wheelEvent for normal window scroll

        if not event.modifiers() & Qt.ControlModifier:

            event.ignore()

            return


        num_pixels = event.delta()

        if num_pixels > 0 :

            self.main_window.zoom_in()

        if num_pixels < 0 :

            self.main_window.zoom_out()

        event.accept()
At the time of writing the Raspberry Pi includes PySide2, but not the current version which is PySide6. It is likely that the code will work in PySide2, but you will need to change the names for the imported modules (libraries). To run using PySide6 on the Raspberry Pi (and other Debian based Linux distributions) then you can follow the instructions below.
mkdir ~/venv

python -m venv ~/venv/pyside6

source ~/venv/pyside6/bin/activate

pip install pyside6
Then to run use:
source ~/venv/pyside6/bin/activate

python3 demo.py
These are the projects I'm currently working on, although at the time of writing it's early days for both programs.

See my other programming guides at: