- Home
- Learn Linux
- Learn Electronics
- Raspberry Pi
- Programming
- Projects
- LPI certification
- News & Reviews

Google Ads
The original Raspberry Pi Pico took the maker world by storm with its custom silicon and incredibly low price tag, but it had one notable blind spot for modern makers: it couldn't connect to the internet. In today's era of the Internet of Things (IoT), where everything from your living room lights to your garden sensors needs to talk to the web, wireless connectivity is no longer just a luxury—it is an absolute necessity. Enter the Raspberry Pi Pico W. By adding built-in Wi-Fi to the already powerful microcontroller, this upgraded board completely changes the game. Whether you are building smart home automations, remote weather stations, or web-controlled robots, the Pico W brings your MicroPython and C/C++ projects online seamlessly.
The Raspberry Pi Pico is a small inexpensive microcontroller based around a custom designed integrated circuit. It has support for C/C++ as well as MicroPython. I've already created a guide to Getting started with the Pico.
The main thing lacking from the original Pico is networking, and particularly wireless networking. In the current times of IoT where just about everything is getting on the Internet, some form of wireless connectivity is pretty much essential. Fortunately that has changed with the new Raspberry Pi Pico W (Wireless).
There have been ways to add connectivity in the past. The ones I've looked at already are:
The Pico W is a big step forward by adding Wireless Wi-Fi capability to the Pico. This is through the addition of an Infineon CYW4343 wireless module. The chip has WiFi 2.4Ghz as well as Bluetooth although only WiFi is supported at the moment.
This video is a quick introduction to my latest project A Wireless voltmeter.
The Wireless voltmeter is a wireless version of the Raspberry Pi and Pico voltmeter
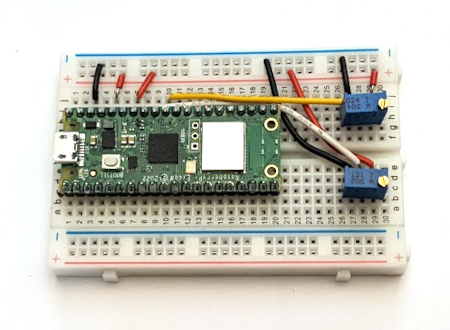
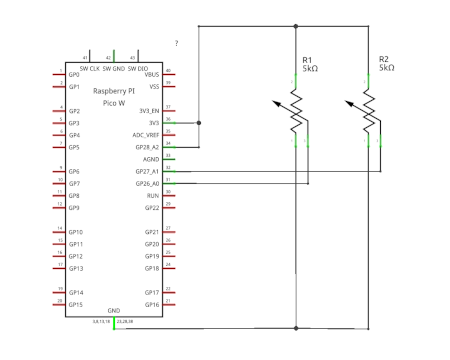
Below is the circuit schematic diagram which shows how I used two variable resistors (potentiometers / trimmers) to vary the voltage to the two pins ADC0 and ADC1.
The source code is included below. You will need to put in the local SSID and password. Initially I suggest running through an IDE such as Thonny so that you can see the IP address assigned by your DHCP server (router).
Assuming your Pico always gets the same DHCP IP address then you can save the file as main.py and it will run on startup and you can connect without the Pico needing to be physically connected to a computer.
To see future updates please:
Subscribe to the PenguinTutor YouTube Channel
Please view the copyright information regarding use of the circuits.