- Home
- Learn Linux
- Learn Electronics
- Raspberry Pi
- Programming
- Projects
- LPI certification
- News & Reviews

Google Ads
This is the first Raspberry Pi based project that I have done with my children. This is my son's school project which was opened up as a family project. My son (age 5) made the bee model, the bee hive and the flower and my daughter (age 7) was responsible for the programming. I helped out with some of the soldering and with the research into getting Scratch to talk to the Raspberry Pi GPIO ports.

See the YouTube video for a quick demonstration. Raspberry Pi bee project.
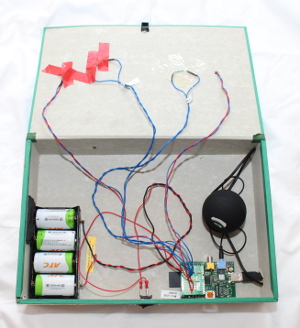
The project is based around a low cost Raspberry Pi educational computer. There are two models of the Raspberry Pi and whilst either will work the model A has been used for this project; which is cheaper than the model B, and has a lower power requirement. The Raspberry Pi is powered by 4 x D-Cell rechargeable batteries connected through an on/off switch to the GPIO connector.
The location of the bee is determined using two reed switches and a magnet inside a bee made out of air clay. The reed switches and two LEDs are connected using appropriate resistors to the Raspberry Pi GPIO using a Slice of Pi expansion board.
The reed switches connect from pin 7 (flower reed switch) and pin 19 (hive reed switch) to ground. The LEDs are connected to pin 11 (bee hive LED) and pin 12 (flower LED).
My 5 year old son made most of the model and even helped a little with the soldering of the LEDs, but I did the soldering on to the Slice of Pi.
The programming was done by my 7 year old daughter. I've recently been teaching her Scratch programming using the Raspberry Pi educational manual and this is her first software project. I did the research on getting Scratch to talk to the GPIO (details in a future post), but she created most of the rest of the code on her own. There is one anomoly (feature/bug?) in that image on the screen changes as soon as the bee is moved away whereas the LED and bee sounds change only after the sound has finished playing, but that would have been quite difficult to explain and fix, so has not been tackled.
The source code is shown below:
![]()
There was some additional setup necessary; in particular a Python GPIO library is required so that Scratch can communicate with the Raspberry Pi GPIO ports and some changes are needed to Scratch to remove a pop-up message.
Details of the configuration changes required are in a corresponding blog entry: Running Scratch program - auto full screen (presentation mode) with Raspberry Pi GPIO.
This was relatively inexpensive considering it is an interactive project and includes the cost of a dedicated computer. The two main costs were the Raspberry Pi (which can be reused in other projects) and the rechargeable batteries (which cost about the same as the Raspberry Pi). The speaker used is a MP3 player speaker which was quite expensive, but it should be possible to get a low cost unpowered speaker from a discount shop or by wiring your own from standard components. The list below shows approximate costs and suppliers:
Also used are a keyboard and mouse (existing ones used for PC) and optional monitor with appropriate cable (eg. DVI / HDMI to vga convertor).
This was a fun project involving the whole family. We learned about bees as well as programming and some electronics in showing a practical use for reed switches. My daughter is already trying to think up some other projects she can do herself as she really enjoyed helping her brother with his project.
Please view the copyright information regarding use of the circuits.

