- Home
- Learn Linux
- Learn Electronics
- Raspberry Pi
- Programming
- Projects
- LPI certification
- News & Reviews

Google Ads
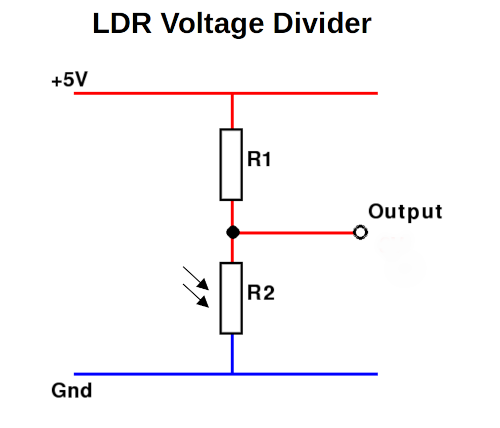
This is an extension of the voltage divider circuit using an LDR (light dependent resistor). The LDR is a resistor which changes resistance based on the amount of light. The examples used varied from approximately 2KΩ (in very bright light) to 150KΩ (in darkness).
For more details about resistor voltage dividers see electronic beginners guide to resistive voltage divider.
The following video shows the circuit and a demonstration.
The basics of the circuit are shown in the diagram below. In this case this is across a 5V power supply. There is one fixed resistor (R1) which is 2KΩ, then a LDR used for R2. Using this configiratuion the output voltage will increase as the light level decreases, if the two resistors were swapped then the opposite would happen.
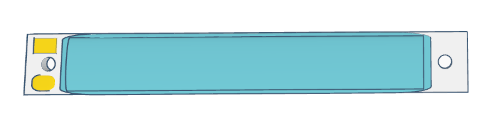
The light output is provided using a COB (chip-on-board) LED Light strip. These have a very high brightness, just needing a 5V input. They use up to 600mA of current, so may need a separate power supply. They are available in a variety of colours, the example shown in the video is actually blue, but due to the brightness it is hard to tell. These are available from The Pi Hut (see the link below).
The MOSFET switch is needed to allow us to switch the 600mA that the COB LED Light Strip needs. The MOSFET used here is an IRL520, but other MOSFETS such as the IRLB8721 can also be used.
A 470Ω resistor is used at the gate of the MOSFET to limit the inrush current. A full explanation of the MOSFET switch is provided at electronics tutorial on MOSFET switch.
An example circuit uses the LDR voltage divider for the analog input and then switches the COB LED light using a MOSFET switch circuit.
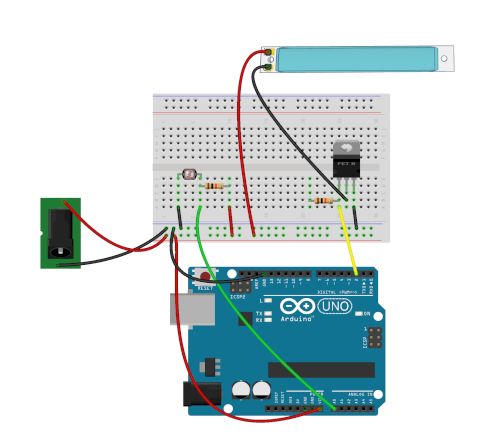
The arduino reads in the value which will be a value between 0 and 1023. The light is set to turn on at a value of 800, which was determined by adjusting the light level and monitoring the input using a serial console. A different value is used to switch the LED off as otherwise there will be a level of light where the input varies causing the light to flash.
The Arduino sketch below uses a simple loop to monitor the input and switch the light on and off as appropriate.
int analog_input = 0;

int light_on_value = 800;

int light_off_value = 750;


void setup() {

  // put your setup code here, to run once:

  Serial.begin(9600);

  pinMode(2, OUTPUT);

}


void loop() {

  // put your main code here, to run repeatedly:

  analog_input = analogRead(A0);

  Serial.println(analog_input);

  if (analog_input > light_on_value) {

    Serial.println("Light on");

    digitalWrite (2, HIGH);

  }

  else if (analog_input < light_off_value) {

    Serial.println("Light off");

    digitalWrite (2, LOW);

  }


  delay(500);

}
For more details about the Arduino see Arduino getting started guide
Please view the copyright information regarding use of the circuits.

