- Home
- Learn Linux
- Learn Electronics
- Raspberry Pi
- Programming
- Projects
- LPI certification
- News & Reviews


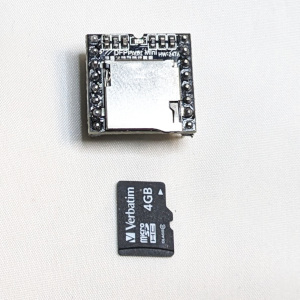
I've created a MP3 player using a Raspberry Pi Pico and the DFRobot DFPlayer Mini. The player is a tiny PCB board, just a little bigger than the Micro SD Card adapter. It can be controlled by adding external button switches or through using a serial connection via UART. In this case I have connected it to a Raspberry Pi Pico which will provide a way to control the MP3 player using automation or via a WiFi connection from a smart phone.

There is some code available from DFRobot which allows it to be used it with aan Arduino, but not for use with a Raspberry Pi Pico, and the code is in C. Whilst I could have likely updated the C code to run on the Pico I instead decided to created a Python library.
There is limited documentation on the protocol and hardly any comments in the code. Through a process of reading the current documentation, running the Arduino version with extra debugging and reverse engineering the source code I've been able to work out most of how it works. The library I have created is not a full implementation of the protocol, but provides the important commands needed to provide a simple MP3 player that can be controlled by the Raspberry Pi Pico. I've added a lot more comments to the library that I've created.

Here is a representation of the breadboard design. This is wired up for both the simplified button control and a UART connection to a Raspberry Pi Pico.
For the buttons there are two way of wiring up buttons. There are two analog pins which can be used with switches and different resistor values to configure 10 buttons each, given a total of 20 buttons. Or this simplified way allows for 4 buttons which are used for Next/Vol- on one button, Previous/volume + on the next button then segment 1 and 5 on the other two buttons. The buttons were used for testing on my board, but won’t be used now I’ve got the Pico connection working.

The real aim is to fully automate this with the help of the Raspberry Pi Pico, which used a two wire UART connection. The yellow wire goes from port GP 4 on the Pico (which is configured as UART transmit on the pico - and UART receive on the MP3 player. The green goes from GP 5 on the Pico configured as UART receive on the Pico going to UART transmit on the MP3 player.
The final part is the speaker. This is intended for use in a model railway locomotive and as such is a basic speaker which does not have a particularly good bass. It is however a good fit for integrating into a model. You can find these from model railway / model railroad shops or by searching for ESU sugar cube speaker kit.
You can download the source code from github.
Upload the file dfplayermini.py to the Raspberry Pi Pico (you can use the upload functionality within the Thonny editor). Then import that to your own python file.
from dfplayermini import DFPlayerMini
Create an instance of the DFPlayerMini class, providing the UART number (typically 0 or 1), followed by the trasmit pin number (eg. GP 4, for physical pin 5), and then the receive pin number (eg. GP 5 for physical pin 6).
player1 = DFPlayerMini(1, 4, 5)
Issue a reset against the player (which you may need to attempt multiple times - typically 2 to 3 times).
player1.reset()
The reset will return True when it has successfully reset the MP3 player. You can then call any of the methods. For example set the volume to 12 (out of 30) using
player1.set_volume(12)
Select the SD card using
player1.select_source('sdcard')
Start playing a track using
player1.play(track_number)
Reset the board ready to start communicating. Run this until it returns True.
Set the volume. volume_value can be between 0 (off) and 30 (max)
Increase / decrease the volume
Choose the source fo the audio. Actual sources depend upon the type of player. Eg. 'usb', 'sdcard', 'aux', 'flash'
Stops playing the track
Play a specific track number
Play the next, or previous track
Player the specified track number in a loop
Pauses the play (resume using start)
Plays the current track (eg. resume after a pause)
Get the number of files on the SDCard / audio source.
I eventually intend to use this as part of a model railway layout providing sounds for the station building. See the link below for more details of model railway projects.
Please view the copyright information regarding use of the circuits.