- Home
- Learn Linux
- Learn Electronics
- Raspberry Pi
- Programming
- Projects
- LPI certification
- News & Reviews

Google Ads
This project is an alternative version of the model railway Christmas house project. In that project I created a model house with a colour changing snowman and decorative Christmas lights. This project is based around the same 3D printed building, but just provides the basic functionality of an internal light, flickering fireplace lights and optional smoke generator for the chimney. This is a version based around a Raspberry Pi (or other device) and an ESP32 microcontroller.
Bring a touch of high-tech, cozy charm to your winter village or model railway! This project guides you through building a beautifully illuminated miniature house, complete with a warm internal glow, a realistically flickering fireplace, and even a working chimney smoke generator. By combining custom 3D printing with the power of an ESP32 and a Raspberry Pi, you can create a captivating holiday scene.
The building is designed in TinkerCAD and printed on a 3D printer. It is based on a weigh bridge building for a model railway, but makes a nice size for a Christmas themed house.
See the following page for details about 3D printed G-Scale model railway building
This is a simplified version compared to the Christmas light project, although it would be easy enough to add those features onto the ESP32 microcontroller.
The ESP32 is actually a series of microcontroller chips produced by Espressif systems. See my beginner's guide to ESP32 on the electronics tutorials for details on setting up the Arduino IDE for ESP32.
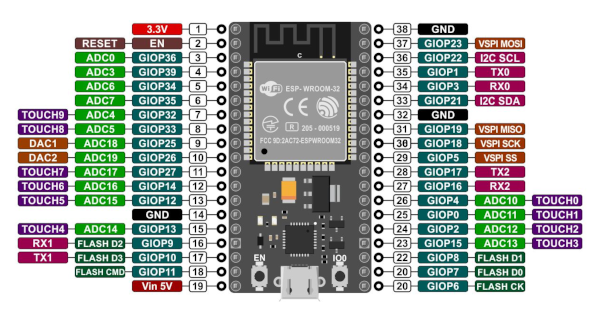
The particular board I am using is the AZ ESP32 Dev KitC V2 ESP32-WROOM-32. There are newer version of this board available, but most work in a similar way. You should be aware of the different pin-out that some boards have. In the case of this particular board you can look at the labels on the board.
The network feature of the ESP32 allows us to configure the ESP32 as a webserver. This can be used to provide a client server setup where the ESP32 acts as a server with a user interface on a remote computer such as a Raspberry Pi or even a mobile phone. This can also be used to create a GUI application that can control electronics remotely.
This can be provided over a local network or over the Internet through IoT (Internet Of Things). In this project I have connected both the ESP32 and a Raspberry Pi to the same local network.
The library that I'll be using here is WiFi.h.
To include the code then you first add the entry:
#include <WiFi.h>
There are various ways to setup networking, which could include the ESP32 acting as a WiFi hotspot. In this case I'm going to have the ESP32 connect to an existing WiFi network with a static IP address.
This is the setup code - for my particular setup.
const char* ssid = "MyNetworkSSID";

const char* password = "NetworkPassword";


// Set your Static IP address

IPAddress local_IP(192, 168, 0, 53);

// Set your Gateway IP address

IPAddress gateway(192, 168, 0, 1);


IPAddress subnet(255, 255, 255, 0);

IPAddress primaryDNS(8, 8, 8, 8);

IPAddress secondaryDNS(8, 8, 4, 4);


// Set web server port number to 80

WiFiServer server(80);


void initWiFi() {

  WiFi.mode(WIFI_STA);

  WiFi.begin(ssid, password);

  Serial.print("Connecting to WiFi ..");

  while (WiFi.status() != WL_CONNECTED) {

    Serial.print('.');

    delay(1000);

  }

  Serial.println(WiFi.localIP());

}
The code for handling incoming requests goes within the loop function.
  // Variable to store the HTTP request

  String header;


  WiFiClient client = server.available(); // Listen for incoming clients


  if (client) {

      while (client.connected()) { // loop while the client's connected

        if (client.available()) { // if there's bytes to read from the client,

          char c = client.read(); // read a byte, then

          Serial.write(c); // print it out the serial monitor

          header += c;

          if (c == '\n') { // if the byte is a newline character

          // if the current line is blank, you got two newline characters in a row.

          // that's the end of the client HTTP request, so send a response:

            if (currentLine.length() == 0) {

            // HTTP headers always start with a response code (e.g. HTTP/1.1 200 OK)

            // and a content-type so the client knows what's coming, then a blank line:

              client.println("HTTP/1.1 200 OK");

              client.println("Content-type:text/html");

              client.println("Connection: close");

              client.println();


              // Handle the client string using the header String


              /* Return html to client using client.println with the html page */

            }

          }

        }

        header = "";

        // Close the connection

        client.stop();

        Serial.println("Client disconnected.");

        Serial.println("");

      }

    }
In addition to adding the html and the code to handle turning the LEDs on and off I've also included some code to reconnect if the connection to the router timesout. The complete source code is included on the github page.
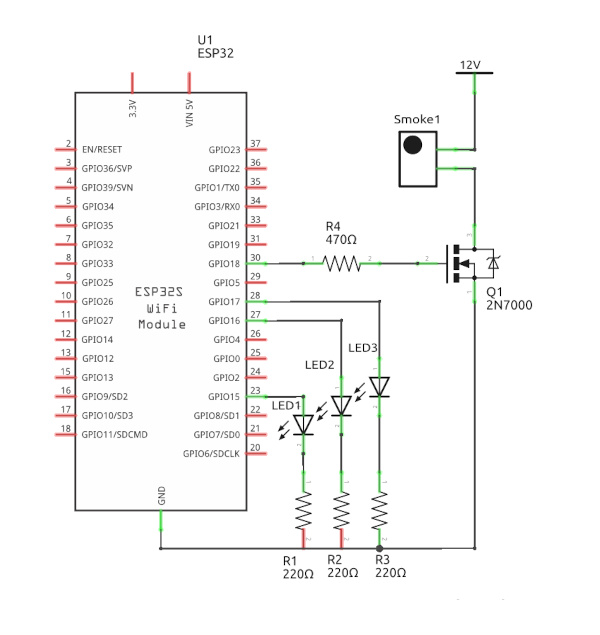
I have used three LEDS. A white LED for a lamp or house light, and then a red and yellow LED which flicker together to imitate the light from a coal fire.
The Circuit for this is very simple. Each of the LEDs connect from the GPIO pin through a 200Ω resistor to ground. The smoke generator needs a bit more circuitry as these will need a higher voltage and current than the Raspberry Pi GPIO pins can provide. The smoke generator will typically need between around 12 and 20V to work. I used a MOSFET switch connected through a resistor to the GPIO to switch the smoke generator on.
The schematic diagram is shown below:
The ESP32 development board came with headers pre-soldered on, which means it can be plugged into a breadboard. There are however a couple of potential issues. One is that the pin spacing is not quite the same as the breadboard layout and the other is that if inserted into a single breadboard then one side will only have a single pin of the breadboard accessible. I overcame both these problems by using two breadboards connected together, but with only one of the power rails. The power rails are normally on both boards, but held in place with a self-adhesive foam board. I cut through the foam board allowing me to remove one set of power rails and then connect them together.
The breadboard layout is shown in the diagram below:

With the code used previously then it provides a web interface that can be used to control the lights. You can click on the buttons to turn the particular light off, on or to set it to flicker. This can be used from any web browser on the same network such as a PC or a mobile phone.
If you wanted to enable this to work over the Internet then you could do so, but you would need to enable port forwarding on your home router and either optionally use something like Dynamic DNS to give it a more user friendly hostname. Beware though if you do that then anyone will be able to turn the LEDs on and off as there is no authentication needed. I'll be using mine only on my home network which means it is only accessible to those with my home WiFi password.
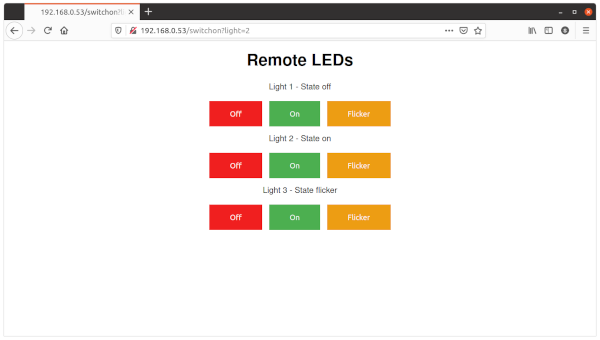
I have not included the smoke generator on the web interface, but note that will not stop anyone turning it on or off as it uses the same URL as the other lights just using the light number as 4.
The final step for this is that I wanted to be able to control the lights using a graphical interface which I will run on a Raspberry Pi. I have updated my previous code which uses Pygame Zero but now instead of it controlling the LEDs directly it uses URLLib to send a http request to the ESP32.
The code uses 3 actors to represent the Window (for the inside light), the fire (a pile of coal to the side of the building) and smoke (the chimney).
Clicking on an of these buttons will result in the urllib request being sent to turn the appropriate light on, off or to flicker.
The snippet of code below shows how that is sent. Note that there is no error checking, although I have wrapped the urllib request in a try except loop to prevent the GUI from crashing if the ESP32 server is not available.
# status is string "on, off, flicker"

def set_light (light_id, status) :

    if (status == "on"):

        url = WEB_ADDR + "switchon?light="+str(light_id)

    elif (status == "off"):

        url = WEB_ADDR + "switchoff?light="+str(light_id)

    elif (status == "flicker"):

        url = WEB_ADDR + "flicker?light="+str(light_id)

    # no checking just fire request and assume successful

    # if connection lost then it ignore failures

    # but will work again when available

    try:

        with urllib.request.urlopen(url) as response:

            returned_text = response.read()

            # ignoring the returned value

    except:

        pass
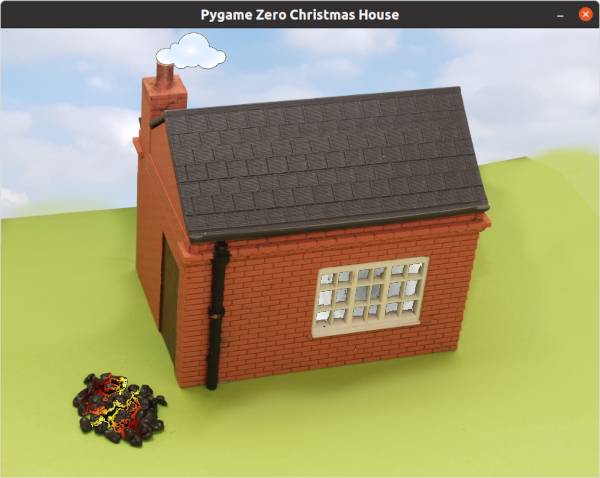
Clicking on the fire will cause both the red and yellow LEDs to flicker. This screenshot shows all the different lights and the smoke generator activated.
Download the source code and circuit diagrams from the Model House source code Github page.
This project has just been a simple demonstration of how you can use an ESP32 to allow LEDs to be controlled by a web interface. The ESP32 includes a powerful microcontroller which can be used for far more than this demonstration.
There is also a good chance that you use the ESP32 or similar indirectly when using WiFi on other microcontroller boards. The ESP32 is a popular choice for Arduino and some of the boards based around the processor in the Raspberry Pi Pico. I have used the Arduino WiFi boards in the past and will be covering other boards such as the Arduino Nano RP2040 (which uses a NINA-W102 based around the ESP32) in the near future.
To see future updates please:
Subscribe to the PenguinTutor YouTube Channel
Please view the copyright information regarding use of the circuits.

