- Home
- Learn Linux
- Learn Electronics
- Raspberry Pi
- Programming
- Projects
- LPI certification
- News & Reviews

Google Ads
If you're ready to upgrade your trackside scenery and rolling stock with custom electronics, you're in the right place. This index is a dedicated hub for model railway automation, featuring step-by-step builds powered by Raspberry Pi and Arduino microcontrollers. Whether you need to assemble a precise point controller, automate your track power, or bring interactive, programmable elements to your garden railway, these tutorials provide the code, wiring diagrams, and 3D design steps you need to bring your ideas to life.
Best of all, these maker projects aren't limited to a single gauge. From the fine details of indoor OO and HO scale setups to the robust, weather-resistant needs of a 45mm G-Scale garden railway, the microcontrollers and programming techniques you'll find here can be easily adapted to suit whatever size trains you happen to run.
This project is a bit different to the others in that it isn't just about computing and electronics. This is an ongoing project to build a G-Scale Model Railway in our garden. It's a project involving myself and my son, with some electronics, 3D printing as well as traditional woodworking and other crafts. I have previously created indoor model railways at OO scale, but this is my first go at larger outdoor model railways.
This is an introductory video showing you around my outdoor layout.
Please Subscribe and click the bell icon to be notified of my future videos.
I've automated my model railway layout using a Raspberry Pi with a motor controller. It's possible to run trains in either track using full automation (station start and stop), IoT (web based control) or traditional analog controller.
I have created a YouTube video series explaining the different aspects of controlling the model train. The first video is shown below. For the full series (as released) see the Model Railway Automation page. Alternatively go to YouTube Model Railway playlist.
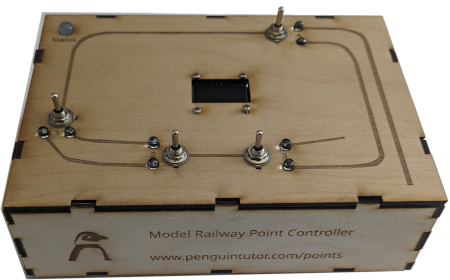
For my indoor railway I needed a way to control points on the layout. Although the trains were DCC the controller I had did not support points, and even if it did I liked the idea of having a manual switch-board which allows me to flick a switch to change the points.
The point controller is based around a Raspberry Pi Pico W, which includes a web server allowing for control via phone, or computer and a physical I2C expansion board allowing for the points to be controlled using mechanical electronic switches.
I also incorporated a Capacitor Discharge Unit (CDU) in the project to reduce the load on the power supply and to improve the switching reliability. This was based on my own circuit design using a MOSFET rather than the usual biopolar junction transistor.
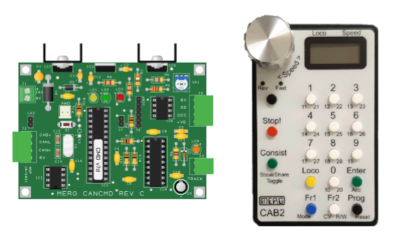
I've also joined as a member of MERG, the Model Electronics Railway Group. I've bought some of their kits from the Kitlocker, including some around DCC and a USB interface to CBUS (implementation of CANBus for model railways).
I'm currently working on implementing some of these and I'll be adding a write-up and video about some of these projects in future.
In the meantime I have provided a setup guide for using the CBUS model railway modules with JMRI (Java Model Railroad Interface).
I've used a Raspberry Pi Pico and DFRobot DFPlayer Mini to provide a way to play sounds to represent scenes on a model railway.
This includes the ability to create station announcements and other sounds related to model railway scenes.

I have been creating some items for the railway using a 3D printer. So far most of the 3D printing designs have been based around simple models (see Creating 3D printer models in blender), but we are now looking at the tools used to create our own designs to scale.

The first is a small building which includes a smoke generator to give the effect of smoke coming out of the chimney.
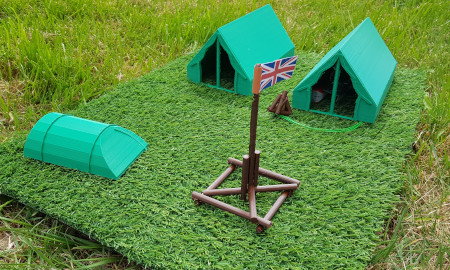
This is a Scout campsite model created in TinkerCAD. It includes a campfire with LEDs controlled using an Arduino.
I've also created other accessories including G-Scale traffic lights for my outdoor railway.
I've also added some adapters and other features designed for 3D printing.
Some electronics projects also include elements of 3D printing and/or laser cutting.
To see future updates please:
Subscribe to the PenguinTutor YouTube Channel
Please view the copyright information regarding use of the circuits.

